Has anyone ever tried to go a period of time without buying groceries? I am toying with the idea of going two weeks on, two weeks off with grocery shopping. The first two weeks would be grocery shopping as normal, particularly stocking up on good deals of things we eat regularly. The second two weeks would be focused on using what is in our pantry, fridge, freezer, etc. We would still be able to buy milk, bread, and produce as needed. Perhaps also making exceptions for items we find through couponing that are 50% or more off their normal price that we consume on a regular basis.
So has anyone ever tried something like this? How did it go?
Wednesday, March 30, 2011

Sunday, March 27, 2011
Pirate Birthday Party!
Over the weekend my son turned 4, and requested a Jake and the Neverland Pirates party. It ended up being pretty cheap and simple, and the kids had a great time! So I thought I'd share some pics in case anyone out there is looking for ideas!
Decorations:
We bought some pirate stuff at Target (pretty decent birthday party stuff for a good price, BTW). We got a fabric banner for about $3, some streamers, a tablecloth, and balloons. Then it occurred to me that I didn't have anything to make it about Jake and the Neverland Pirates, so I printed some pictures off the internet and just taped them to my walls (super high-class around here, can you tell?). You can also see on the second picture my Birthday Collage - I always put up a collage of pictures of my kids on their birthday each year.

 Games & Activities:
When the kids first came in, they did a Jake and the Neverland Pirates coloring page. Just wanted to give them something to do while we waited for all the guests, other than pulling out all my kids' toys. One of the kids asked if they were placemats. Hmmmmm... I pulled out my laminator, and then suddenly, they were!

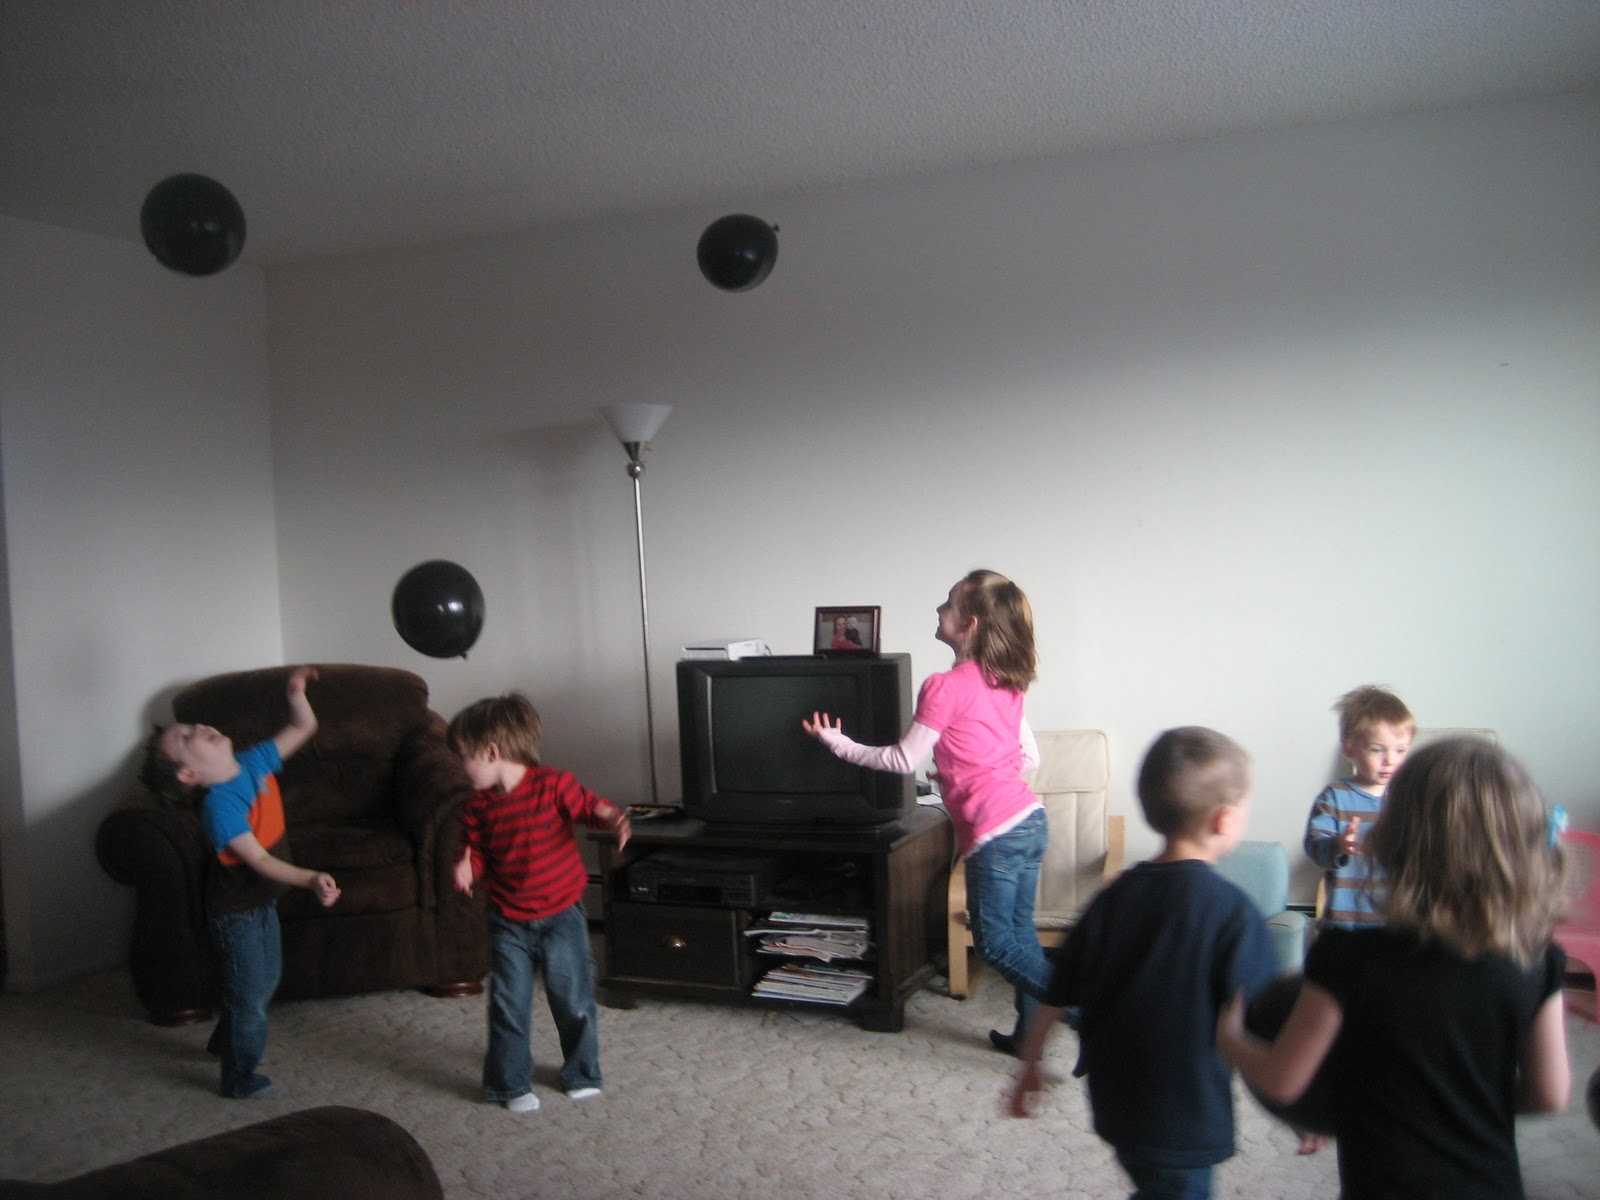
The $1.52 bag of balloons was definitely the highlight of this party. We used the black ones to play Cannon Launch (who could hit a balloon the furthest), Shoot Captain Hook (they all stood behind the line and tried to pelt me with balloons), and Keep the Cannons in the Air (trying to keep all the balloons from falling to the ground). We also used a quick YouTube link to learn how to make balloon swords and made swords for everyone and then the kids had swordfights. They LOVED this (hint: make extras!).


I also put together a treasure hunt. I took pictures of different locations around the house, and then made a picture Treasure Hunt. I gave them the first picture, then they went to that spot, found the next picture, etc., until they found the "treasure." The treasure was a box with their goody bags in them - containing an eye patch, chocolate coins, ring pops, and popcorn.


The Food:
My son requested hot dogs, so we had that all planned out. Then I saw an idea online to turn hot dogs into pirate ships, with Goldfish crackers scattered around. I think these turned out cute, especially considering we put them together in like 5 minutes.
 For the cake, we did a pirate hat, with some gold coins scattered around. This was a pretty easy cake made from two 8" rounds. It was in last month's Family Fun magazine.

All in all, I would consider this one of our best kids' parties. As I mentioned, everything was extremely cheap and easy to do, and the kids had an awesome time. My son loved it all!
Decorations:
We bought some pirate stuff at Target (pretty decent birthday party stuff for a good price, BTW). We got a fabric banner for about $3, some streamers, a tablecloth, and balloons. Then it occurred to me that I didn't have anything to make it about Jake and the Neverland Pirates, so I printed some pictures off the internet and just taped them to my walls (super high-class around here, can you tell?). You can also see on the second picture my Birthday Collage - I always put up a collage of pictures of my kids on their birthday each year.


When the kids first came in, they did a Jake and the Neverland Pirates coloring page. Just wanted to give them something to do while we waited for all the guests, other than pulling out all my kids' toys. One of the kids asked if they were placemats. Hmmmmm... I pulled out my laminator, and then suddenly, they were!

The $1.52 bag of balloons was definitely the highlight of this party. We used the black ones to play Cannon Launch (who could hit a balloon the furthest), Shoot Captain Hook (they all stood behind the line and tried to pelt me with balloons), and Keep the Cannons in the Air (trying to keep all the balloons from falling to the ground). We also used a quick YouTube link to learn how to make balloon swords and made swords for everyone and then the kids had swordfights. They LOVED this (hint: make extras!).

I also put together a treasure hunt. I took pictures of different locations around the house, and then made a picture Treasure Hunt. I gave them the first picture, then they went to that spot, found the next picture, etc., until they found the "treasure." The treasure was a box with their goody bags in them - containing an eye patch, chocolate coins, ring pops, and popcorn.


The Food:
My son requested hot dogs, so we had that all planned out. Then I saw an idea online to turn hot dogs into pirate ships, with Goldfish crackers scattered around. I think these turned out cute, especially considering we put them together in like 5 minutes.


All in all, I would consider this one of our best kids' parties. As I mentioned, everything was extremely cheap and easy to do, and the kids had an awesome time. My son loved it all!

Tuesday, March 22, 2011
How-Tuesday: How To Set Up a Dinner Exchange Group

Cooking dinner every night kind of sucks. What you need is a Dinner Exchange Group, which is where you swap meals with one or more families each week. Doing a dinner group can save both time and money, and it's a great way to try new recipes and ideas. So here's how to set one up:
1) First, figure out how many nights you want to be doing this. I find that 2-4 families usually works out about right. No one wants to be doing this every night - we all have other obligations.
2) Ask around to find some families to join you. We always try to find families that are similar in size to ours so that we are exchanging equal amounts of food.
3) Once you've got your group, decide on your ground rules. You need to have everyone pick a night they want to cook, and decide how you are doing your portioning and menu planning. Discuss likes and dislikes, what to do about canceling, time frame for meal delivery, etc. (See notes later on for more discussion on these.)
4) Get started! Just know that at times, everyone is going to make things that don't turn out very well, or didn't make enough, or whatever. It happens - don't stress out.
5) Touch base regularly and honestly. If there are things that aren't working, speak up. You're not doing anyone any favors by continuing to participate resentfully, or by throwing away a certain meal each time it's made because you're too embarrassed to say you don't like it. We met every few months and just went over our old calendars and said what meals our family really DID like, and that worked well so that people knew what was good to repeat.
6) Sit back and enjoy your night(s) each week where you don't have to do any meal prep or clean-up!
Some Notes From the Trenches:
If you're serious about wanting to set up a group, I thought I'd share some more detailed notes on things we've learned along the way.
*Menu-planning: In my old group, we used a Yahoo calendar to set up meals so that there was no duplication. In the beginning we did a meat rotation (chicken, beef, other) so that there was variety, but after time we abandoned that and just paid attention to what other people were calendaring in so that we didn't have a whole bunch of chicken in a row, or pasta, or whatever. In my group now there are only 2 families and we just make whatever. It causes me a bit of anxiety to not have it scheduled out, but it works for the other family, so I go with it. Another group I'm familiar with meets for breakfast one Saturday each quarter, brings their recipes/cookbooks, and schedules out the whole quarter right then and there.
*Side dishes: This can be handled in a variety of ways, from exchanging the meat, carbs, veggies, and desserts to just exchanging the main dish. Again, this is just one of those things you have to discuss with your group to see what works for everyone. We also never exchanged sour cream or shredded cheese (like as a topping), because those were things we all agreed we had on hand and it was more hassle than it was worth to deal with a tiny little container of sour cream.
*Portioning: In one group, we had designated tupperware containers that we determined were the right portions to exchange, and you just filled them, and we only swapped those containers. Everyone put in like $10 up front to buy the containers. Or, you can just kind of talk about how much you feel is an appropriate portion for each adult and kid and stick to it.
*Meal ideas: Uh, obviously not everything works well for a dinner exchange. You need to plan stuff that will travel well, and sit well since it won't be eaten immediately. Soups, salads, casseroles, stir-frys, etc. are all great. If you'd like, you can check out our old Yahoo calendar for ideas. I participated in this group during all of 2008 and some of 2009 so there are lots of ideas. Sample Dinner Group Calendar
Any other questions? Just ask! We've been doing some form of a dinner group for almost 4 years now, so we've had a lot of experiences, both good and bad!
Friday, March 11, 2011
Amazon.com Subscribe & Save
So I recently began looking more carefully at our budget and realized we were spending quite a bit on groceries and household products. And while I like the IDEA of couponing, the reality is difficult for me, largely because I live in Alaska, where our coupon inserts are very sparse and food prices are extremely high.
So I began blog-hopping and discovered something I had never heard of - Amazon's Subscribe & Save. Amazon.com sells groceries, and with Subscribe & Save you can get an additional 15% off if you sign up to have them delivered at certain intervals (1, 2, 3, or 6 months). Amazon also has their own coupons and coupon codes. And shipping is FREE for any amount, which is a huge plus if you are one of my Alaskan friends! You can easily cancel or change the frequency of your delivery at any time.
Right now Amazon.com has a 10% off code for Kellogg's cereals, plus an additional 15% off if you do the Subscribe & Save. The cereal comes in at under $2/box, which is not great for those who can do couponing, but in Alaska, that's a pretty great price. This extra 10% off ends March 31st.
I got 4 of the 16-oz. boxes of Raisin Bran for $6.97 shipped, or about $1.75 per box. Not too bad!
So go check out Amazon's Subscribe & Save service!
Does anyone else use Subscribe & Save? What are some of the good deals?
So I began blog-hopping and discovered something I had never heard of - Amazon's Subscribe & Save. Amazon.com sells groceries, and with Subscribe & Save you can get an additional 15% off if you sign up to have them delivered at certain intervals (1, 2, 3, or 6 months). Amazon also has their own coupons and coupon codes. And shipping is FREE for any amount, which is a huge plus if you are one of my Alaskan friends! You can easily cancel or change the frequency of your delivery at any time.
Right now Amazon.com has a 10% off code for Kellogg's cereals, plus an additional 15% off if you do the Subscribe & Save. The cereal comes in at under $2/box, which is not great for those who can do couponing, but in Alaska, that's a pretty great price. This extra 10% off ends March 31st.
I got 4 of the 16-oz. boxes of Raisin Bran for $6.97 shipped, or about $1.75 per box. Not too bad!
So go check out Amazon's Subscribe & Save service!
Does anyone else use Subscribe & Save? What are some of the good deals?
Product Review: Nook Color

So I'd been minding my own business, happily ignoring the whole e-reader craze. I'm not one of those purists who only wants to read books with pages made of paper, I'm just one of those cheapos that hates to buy books. So when I heard recently that on the Nook you can check out epub books online, my curiosity was piqued. Then when I checked them out at Barnes & Noble and found out you can browse the internet on them, I was sold.
The Pros:
*You can check out books online from your local library without leaving your house! For me this was the MOST important thing. I have three little kids, I work full-time, and my husband is in school, so my time for going to the library and browsing around is pretty limited. So to be able to just log on, look around, put some virtual books in my virtual cart, and then have them appear on my Nook is AWESOME. Even better, they magically disappear from your Nook when they're "due." No more late fees! Not that I um, ever got late fees at the library, of course.
*You can get online. My husband is in school and spends a lot of time on our laptop, reading and studying. It's nice to have another option for browsing the web, and it's a nice little size.
*Rumor has it that Barnes and Noble is going to start coming out with some apps for it. Not sure of the truthfulness of this, but it's a nice possibility. It does have some games (Sudoku, chess), and you can stream Pandora.
*The color is nice. I don't personally get magazine or newspaper subscriptions on it, but you can. Also, if you have a book that has pictures in it, it's nice to be able to see them in color. Also, there are cute kids books and the color is great on them as well.
*The books aren't actually expensive as I thought to purchase. A lot of the NY Times bestsellers are only $5, and most of the rest are up to about $10-$15. So not too bad.
*The backlighting - for me, I LIKE this. For others, it's a con. With the regular Kindle and Nook, the screen looks like a real book page. With the Nook Color, it's backlit, like a computer screen. I like being able to read in bed, or in poorly-lit areas (which we have a lot of in our house!).
The Cons:
*When people told me you can check out books online, I envisioned these large websites where you can check out anything, immediately. As far as I've found, they don't have that. You need to check out the books from your local public library. Fortunately, I live in an area that's very technologically-oriented, and they have a TON of epub books to check out. But not all libraries are that way. So you may want to find out what your local library has before you use this as a main motivation to buy a Nook.
*It's much harder to go back and find a certain part than it is with a real book. You can search if you want, but if not, you have to tap along a slider bar and sort of try to find the spot you want. This is irritating.
*I worry about how light and fragile it is. My kids know they are absolutely not supposed to touch it. But we all know how that goes sometimes!
So, all in all, I consider it a GREAT purchase. I have read more in the month that I've had it than I have the entire rest of my six years of marriage. I'm reading all kinds of stuff, like several books a week. And I love reading, so it's been great to be able to get back to this hobby. If you have any other specific questions, I'd be happy to answer them, just let me know!
Thursday, March 10, 2011
Chicken Washington
This was a family favorite of ours growing up, and it's so easy that when we all went to college, it was our go-to meal to make when we had company coming over. We called my mom so many times for the recipe that she started calling it "can-can-cup" (for the measurements). I really need to start taking pictures of my recipes, you'll have to take my word for it that it's good!
Ingredients:
1 can cream of chicken soup
1 can CHEDDAR CHEESE soup
1 c. sour cream
chicken tenders (frozen okay)
bacon crumbles
Directions:
Mix the two cans of soup and the cup of sour cream together to make the sauce. Take a 9x13 pan and spray it with cooking spray, spread about a half a cup of the sauce on the bottom of the pan. Then put enough chicken tenders in the pan to cover it in a single layer. Spread the remaining sauce on the top. Put it in the oven at 350 and cook for about an hour. In the last 10 minutes, sprinkle some bacon over the top. Obviously it's best with real bacon, but store-bought bacon bits will do in a pinch. Cook until chicken is cooked through. Serve over rice.
This is a simple, delicious, kid-friendly recipe!
Ingredients:
1 can cream of chicken soup
1 can CHEDDAR CHEESE soup
1 c. sour cream
chicken tenders (frozen okay)
bacon crumbles
Directions:
Mix the two cans of soup and the cup of sour cream together to make the sauce. Take a 9x13 pan and spray it with cooking spray, spread about a half a cup of the sauce on the bottom of the pan. Then put enough chicken tenders in the pan to cover it in a single layer. Spread the remaining sauce on the top. Put it in the oven at 350 and cook for about an hour. In the last 10 minutes, sprinkle some bacon over the top. Obviously it's best with real bacon, but store-bought bacon bits will do in a pinch. Cook until chicken is cooked through. Serve over rice.
This is a simple, delicious, kid-friendly recipe!
Tuesday, March 8, 2011
How-Tuesday: How To Resize a Bunch of Pictures at the Same Time
Guest posting today for How-Tuesday is Janelle from Somewhat Singleminded sharing with us an easy way to resize photos! Thanks, Janelle!
Hello, my name is Janelle and I have two blogs.
This is my public blog.
I post a lot more photos on my private blog. I think that’s one of the reasons I like it better. It’s also one of the reasons I sometimes used to hate it.
My old blog system used to go like this:
1. Major holiday!
2. Take lots of pictures of everything festive!
3. Procrastinate.
4. Procrastinate.
5. Choose a ton of photos to include in festive family holiday blog post. Copy and paste them into a “To Blog” folder.
6. Procrastinate.
7. Whine a little bit.
8. Open Paint and shrink photos, sometimes 80+ photos, one at a time.
9. Write some words.
10. Insert some photos.
11. Hit “publish”.
12. Feel a sense of accomplishment.
Eventually I vocalized my irritation at the tedious nature of my photo shrinking system. My best friend said something like “I just use my photo editing program and resize them all together in a batch. Check your photo editing software.”
I became surprisingly sullen and angry. Why did she get to have a Mac with wonderful programs like iPhoto and also a more brilliant mind that knows its way around a computer? I don’t have photo editing software. I don’t think. And if I do, I have no idea what it is or where to find it.
Sadness.
A few weeks later I lost the chip and rediscovered my “can-do” curiosity. I’m sure there are still even better ways to mass-edit photos, but here’s what I found:

Microsoft Office Picture Manager!
My new blog system goes like this:
1. Major holiday!
2. Take lots of pictures of everything festive!
3. Procrastinate.
4. Procrastinate.
5. Choose a ton of photos to include in festive family holiday blog post. Copy and paste into a “To Blog” folder.
6. Open Microsoft Office Picture Manager and magically shrink photos, sometimes 80+ photos, all at the same time.
I’ll now pretend that I want to blog about some of my craftiness. I chose 24 crafty photos and saved them in a folder that I named “To Blog”.

I opened Picture Manager and the giant red arrow is pointing to the words “Edit pictures”
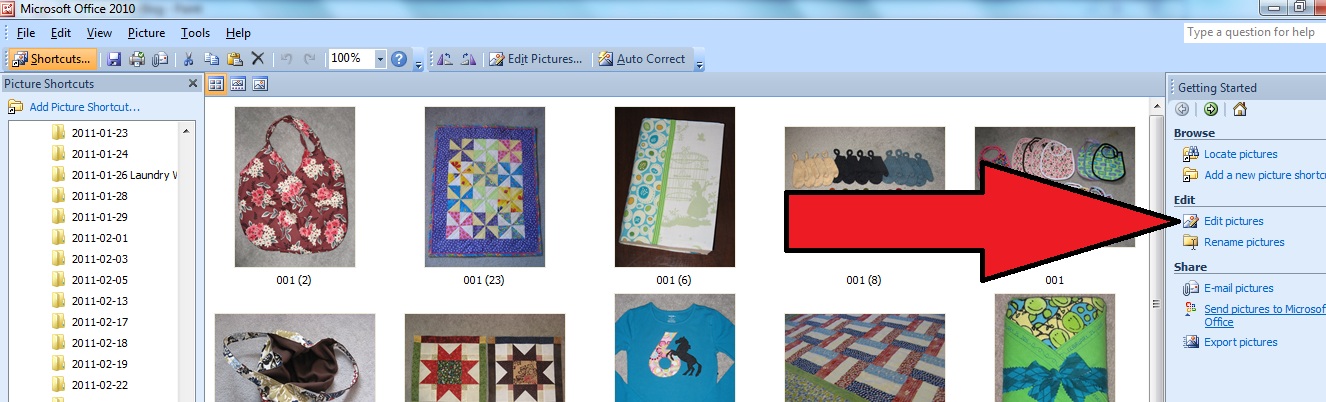
Click on the words “Resize pictures.” Highlight all 24 pictures (do I explain how?) (click on the first picture, hold the shift key and then click on the last picture) The giant red arrow is now pointing to the word “Resize”

I choose a percentage of original width/height (usually 30%) and almost instantaneously all photos become a fraction of their former size.
Then proceed as usual:
7. Write some words.
8. Insert some photos.
9. Hit “publish”.
10. Feel a sense of accomplishment.
Two steps shorter! Less whining and procrastination=more happiness for everyone.
I use Microsoft Office and I shrink photos to add to my blog posts. You might have a different photo editing program and have another reason to edit batches of photos.
Moral of the story: It is possible to simultaneously edit (not just resize, but edit in all kinds of fancy ways) a group of photos.
I just want everyone to know that it’s possible. Also, that for me it was basically life changing.
Subscribe to:
Posts (Atom)